A pre-flight test of the autopilot must be carried out before it is used in the air. Unfortunately there is disagreement between the source documents on how it should be performed.
Full details of the autopilot test are outlined in the S-TEC 55X Pilot’s Guide. However, the Seneca V POH offers a somewhat cut-down version that omits some important checks, but it does refer operators to the S-TEC 55X Pilot Operating Handbook, P/N 87109 dated 01 Mar 2008, for detailed procedures.
After a comparison of both documents, and consideration of how we will use the autopilot, a more complete autopilot test can be derived that checks all of the functions needed during an IR test and omits some areas (such as a check of the FD system without the AP) that are not used in our SOPs. Therefore, perhaps the best way to test the autopilot is as follows:
Power Up
- BATT MASTER – ON
Power is supplied to the Main Bus. - AVION MASTER – ON
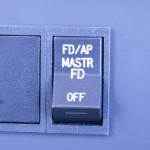
Power is supplied from the Main Bus to the autopilot through the No 1 Avionics Bus. - Autopilot MASTR – FD/AP
Three way rocker switch moved from OFF, through FD to FD/AP.
All annunciations appear on the PFD displays (in the AFCS Status Box) for 10 seconds, and then extinguish.
RDY
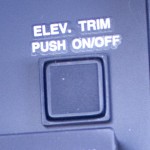
RDY annunciation re-appears on the PFD displays within 3 minutes on completion of the internal self-test. - ELEV TRIM – ON
Switchlight depressed with the green ON annunciation showing and no red FAIL annunciation.
HDG Mode Check
- Move A/C Control Wheel – Left and Right
Its freedom of movement about roll axis indicates that the Roll Servo is disengaged. - PFD Heading Bug Selector – Press
Heading bug moves to the 12 o’clock position.
- Autopilot HDG mode selector button – Press

Autopilot Heading Mode engages.
AP HDG
Green AP and HDG annunciation appears on the PFD autopilot status displays.
- Attempt movement of A/C Control Wheel – Left and Right
A/C Control Wheel’s reduced freedom of movement indicates that Roll Servo is engaged. - PFD Heading Bug Selector – Left and Right
A/C Control Wheel turns to the left and right.
Roll Servo can be overridden. If not, disconnect autopilot and do not use. - PFD Heading Bug Selector – Press
A/C Control Wheel stops moving.
ALT Mode Check
- Move A/C Control Wheel – Forward and Aft
Its freedom of movement about pitch axis indicates that the Pitch Servo is disengaged. - Autopilot ALT mode selector button – Press
Autopilot Altitude Mode engages.
AP HDG ALT
Green AP, HDG and ALT annunciations appear on the PFD displays.

The Flight Director command bars appear on the PFD attitude indicator display and command S&L flight. - Attempt movement of A/C Control Wheel – Forward and Aft
A/C Control Wheel’s reduced freedom of movement indicates that Pitch Servo is engaged. Pitch Servo can be overridden. If not, disconnect autopilot and do not use. - Move A/C Control Wheel – As far Forward as possible
After 3 seconds, TRIM ∧ annunciation appears on the PFD displays and Elevator Trim Wheel begins to run nose up with increasing speed.
After 7 seconds, TRIM ∧ annunciation flashes. - Move A/C Control Wheel – As far Aft as possible
After 3 seconds, TRIM ∧ annunciation appears on the PFD displays and Elevator Trim Wheel begins to run nose down with increasing speed.
After 7 seconds, TRIM ∧ annunciation flashes.
Control Wheel Steering (CWS) Mode Check
- CWS Button – Press and Hold
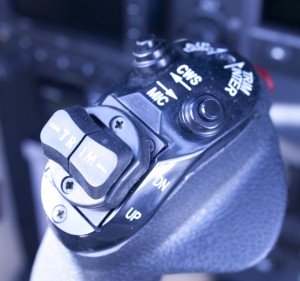
Press and Hold the CWS button to initiate and maintain CWS Mode engagement.
AP CWS VS
Green CWS and VS annunciations replace HDG and ALT on the PFD displays. - Move A/C Control Wheel – Left and Right, Forward and Aft
A/C Control Wheel’s increased freedom of movement indicates that Roll and Pitch Servos are disengaged. - With A/C Control Wheel in the Neutral Position – Release CWS Button
CWS and VS annunciations remain on the PFD displays. - Move A/C Control Wheel – Left and Right, Forward and Aft
A/C Control Wheel’s reduced freedom of movement indicates that Roll and Pitch Servos are engaged.
Vertical Speed (VS) Mode Check
- Autopilot Modifier Knob – Rotate CW until +5 (500 FPM climb) is commanded
The Flight Director commands an increase in aircraft pitch.
A/C Control Wheel moves in aft direction.
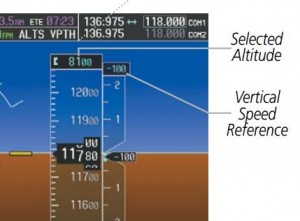
The selected rate of climb appears above the VSI on the PFD. - Autopilot Modifier Knob – Rotate CCW until -5 (500 FPM decent) is commanded
The Flight Director commands a decrease in aircraft pitch.
A/C Control Wheel moves in forward direction.
The selected rate of descent appears above the VSI on the PFD.
Autopilot Disconnect Check
- AP DISC Button – Press
The Autopilot is disengaged.
The Flight Director bars disappear.
RDY
AP is replaced with a flashing RDY annunciation in the PFD autopilot status window.
Audible Alert sounds a periodic tone, while all other annunciations are extinguished.
After 5 seconds, RDY annunciation stops flashing but remains, and Audible Alert is cancelled. - Move A/C Control Wheel – Left and Right, Forward and Aft
A/C Control Wheel’s increased freedom of movement indicates that Roll and Pitch Servos are disengaged and that the autopilot is fully disconnected.
Flight Director Check
- Autopilot MASTR – FD
Move the three-way rocker switch from FD/AP to the central FD position.

- HDG and ALT mode selector buttons – Press

Flight Director, Heading and Altitude Modes engage.
FD HDG ALT
Green FD, HDG and ALT annunciations appear on the PFD autopilot status displays.The Flight Director command bars appear on the PFD attitude indicator and command S&L flight.

- Attempt movement of A/C Control Wheel – Left & Right, Forward & Aft
A/C Control Wheel’s freedom of movement indicates that both autopilot servo are disengaged. If resistance to movement is felt, disconnect autopilot and do not use. - AP DISC Button – Press
The Autopilot is disengaged.
The Flight Director bars disappear.
RDY
FD is replaced with a RDY annunciation in the PFD autopilot status window. Leave the Autopilot MASTR switch set to FD until after take-off to avoid the risk of inadvertently engaging the autopilot prior to take-off.

